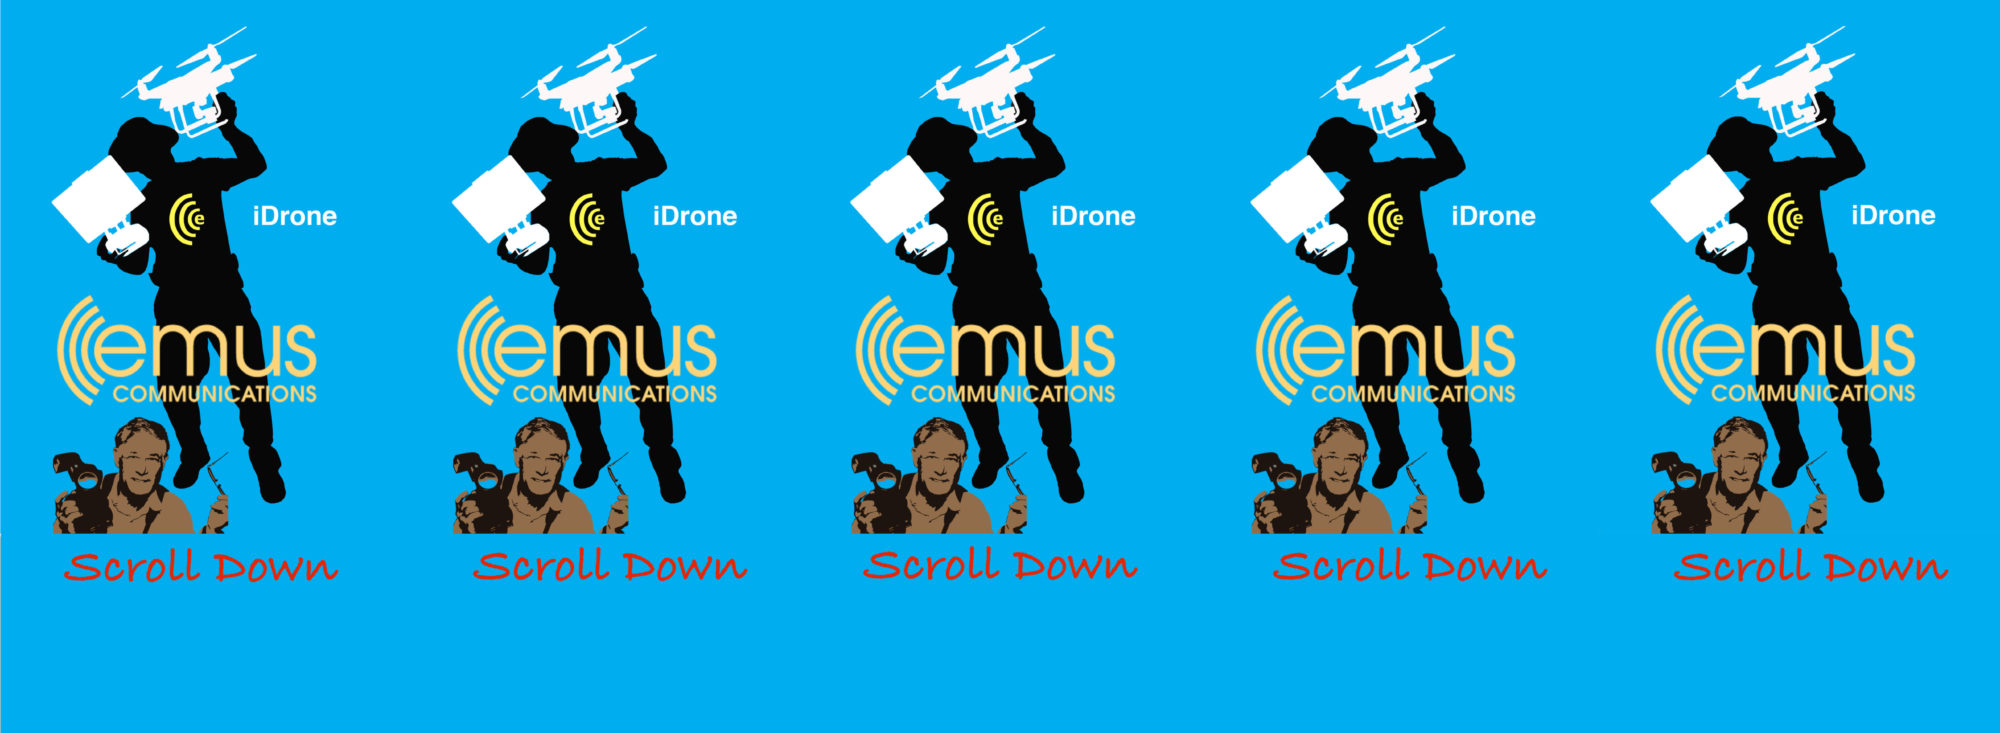
Here I am adding some results of assignments from the Interactive Media Certificate Program. Tap on images for larger view. Some are not smushed; and are full-size for viewing on high-resolution screens, and may be slow to load.


See Trailer
See Group Project
See Music and Sync
Interactive Media Certificate Program
Best deal in town. The price is right: free!
The 36-week Interactive Media Certificate Program (IMCP) is offered at the North City Campus, 8355 Aero Drive, San Diego, CA 92123. Class times were all day Monday through Thursday in the Summer, and all morning Monday through Wednesday in the Fall. Time commitment was 15 classroom hours, and 10 hours online per week.
According to the district’s website, the IMCP offers a unique, life-changing program that has earned an excellent reputation throughout the community and beyond. The college has spent the last ten years “fine-tuning” the program, and takes the job of educating very seriously. The IMCP provides skills and software currently used by industry professionals, and emphasizes a hands-on approach to planning, production, and presentation, plus production of a dynamic portfolio to share with prospective clients or employers. Portfolio projects include Adobe Photoshop manipulations, illustrations, page layouts with logos, newsletters and web designs, plus animations, videos, marketing and educational materials, and web sites.
Students learn how to plan and develop projects from concept and design through production and delivery. Principles of design and composition are implemented throughout the program. Students learn how to integrate color, type, and graphics to convey information and make an impression.
The on-line component accessed the Internet for instruction including researching topics, taking quizzes, learning about accessibility, writing assignments, and watching video tutorials to strengthen and reinforce what is learned in class. Students also did storyboards, thumbnails and assigment proposals on-line.

San Diego Continuing Education (SDCE) is a public, noncredit educational institution in San Diego, California. It is part of the San Diego Community College District along with three two-year community colleges: San Diego City, San Diego Mesa and San Diego Miramar colleges. SDCE is administered by the San Diego Community College District and is fully accredited by the Western Association of Schools and Colleges. SDCE is the nation’s largest separately-accredited noncredit continuing education institution.
SDCE offers noncredit career technical education; adult basic education and basic college preparation; life enrichment programs; general interest fee-based community education classes; and customized contract training classes designed for the business sector. Continuing Education serves approximately 40,000 students per year through its seven campuses: CE at Mesa College, CE at Miramar College, Cesar Chavez, the Educational Cultural Complex (ECC), Mid-City, North City and West City; it also conducts programming at various other off-campus sites throughout San Diego. SDCE is diverse: it is co-educational, multi-generational and multi-ethnic. It has a semester-based academic calendar with an added summer session as a regular part of its offerings.
For further information:
https://sdce.edu/schedule#/menu
Print Module
The print module includes Adobe Photoshop, Illustrator, InDesign, and After Effects.
PHOTOSHOP
Adobe Photoshop is a bitmap digital imaging and editing program that enables students to enhance images and create special effects for the web. Digital editing is used to edit digital images and to create original artwork. The program includes timesaving production techniques for this industry-standard image-editing program which is used by print, multimedia and web professionals. The student also learns how to scan photos, create special filter effects, and incorporate photos and art into text and layout applications. Adobe Photoshop is one of the most important graphic design tools and is the world’s leading image-editing program used by photographers, designers and web professionals.
Photoshop has become the de facto industry standard raster image editing, graphic design and digital art. It makes use of layering to allow for depth and flexibility in the design and editing process, as well as provide powerful editing tools, that when combined, are capable of just about anything. It is published for both macOS and Windows, but not Linux. Photoshop allows users to create and edit raster images in multiple layers. These overlays or layers can support transparency and can also act as masks or filters that can alter underlying images in the layers below them. Shadows and other effects such as alpha compositing can be applied. It is also possible of apply several color models to these layers – CMYK, RGB, Spot Color, and Duotone and Lap color space.
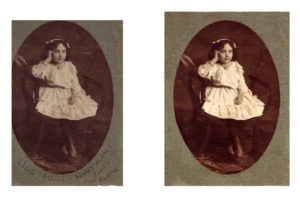 PHOTO RESTORATION
This photo is from a Flickr ancestors album I made of photos I scanned earlier. It had significant scratches and stains, and clipped borders with handwriting. First I did Image, Auto Contrast. Adjustments with channels were abandoned as changing too much from the original, and I couldn’t get the color back. Starting over, I first used the Spot Healing Brush Tool. But this tool seemed to smudge out the texture, so I ended up doing many, many Clone Stamps. I left some slight imperfections to keep the image looking realistic to the time. Finally, I used the rectangular and Elliptical marquee Tools to recreate the top and left side borders that were missing.
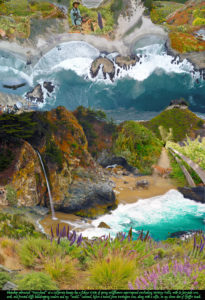 IMAGES MONTAGE
My idea was to show my photography from a road trip last month in a whimsical collage with a theme of “Fairyland” to describe the beauty of Big Sur. A fisheye shot of wildflowers along the coast is superimposed overlooking the McWay Falls, the only waterfall directly into the West Coast. The fairytale cove, arch, and forested cliffs is a backdrop for my “model,” Caramel, who appears before a tunnel from Partington Cove that now appears to go through the saddle at McWay Falls. She also models, along with a selfie, my drone shot of the famous keyhole at Pfeiffer Beach, with the wonderful spring wildflowers. Target audience is friends and family, as well as potential freelance customers or photo contests. Photoshop tools included Layers for arranging photos scaled with the Transform tool. The Layer Mask was used for partial Erasing and blending of one photo with another. The Lasso tool and Magic Wand tools selected areas to delete or adjust Brightness or Opacity. The Brush tool with large feathering “painted” a blending of the edge of photos.
 ILLUSTRATOR
Using the Illustrator application, students create vector graphics used for digital design. This application is the premier postscript vector graphic program used to create object-oriented images—which means students create graphics with smooth edges and small files. The student learns about the leading vector drawing program used by designers who appreciate the program’s precision tools to produce high-quality logos, signs, illustrations, brochures, and packaging. It features superior power and precision. Adobe Illustrator is the primary vector-based software program used by professional graphic designers to create illustrations.
Illustrator is a program used by both artists and graphic designers to create vector images. These images will then be used for company logos, promotional uses or even personal work, both in print and digital form. It is typically used to create illustrations, charts, graphs, logos, diagrams, cartoons of real photographs, and more. While the program may be difficult to understand initially, the final product is well worth the learning curve. Creating vector images allows you to create clean, beautiful works of art that can be scaled up and down infinitely without ever losing quality. Unlike the familiar gif, jpeg, tiff, etc images – known as raster images – vector images are not made up of a grid of pixels. They are instead created by paths – a combination of a starting point and an ending point with a combination of shapes, angles and lines in-between. These paths relate to each other by mathematical formulas, allowing them to be scaled and rescaled infinitely.
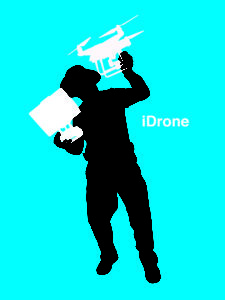 “IPOD AD”
My concept expresses my passion for drone photography with the silhouette of myself holding the 20 megapixel one-inch sensor camera drone and controller. Adobe Illustrator tools used were mainly the pen tool selecting different fills and strokes to apply to many layers, along with the eyedropper tool, rectangle tool, and text tool. I think the finished product was very successful, using one of 40 different reference photos, that expressed the feeling with a slight angular design. The pen tool was used incorrectly at first, and several paths had to be deleted and done over again. Layers had to be stacked in a certain order for certain segments to appear above others. Numerous anchor points were converted to smooth, and other anchor points were adjusted to the reference photo. This seemed rather tedious while low on the learning curve, especially after Photoshop rather easy painting.
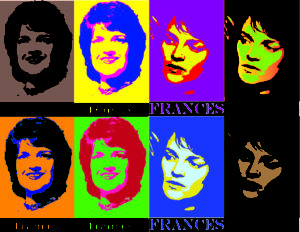 PORTRAIT
These posters are inspired by the iconic artist, Andy Warhol, who did a series on Marilyn Monroe. Portrait images were live traced in Illustrator and then four different color schemes were applied. The advantage of Illustrator is that you can make the original images more displayable that were not the best of quality. The first image is a heavily cropped scanned photo and the other is an old black-and-white photo that I developed years ago in a dark room.
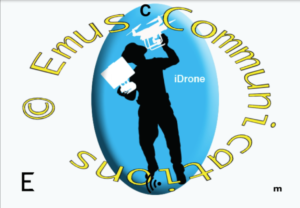
 LOGO DESIGN
My idea was to use a communication symbol for Emus Communications. So I copied a WiFi symbol off Google Images, and rotated and vectorized it as part of the “C” of “E Com.” I was going to spell out Emus Communications underneath, but there was dead space on the right, so I wrapped it around.
Target audience is freelance clients for photography or multimedia services who can see this as a professional and involved business.
The Pen Tool was used to trace a WiFi band for a mask after the “E.” Selection Tools adjusted and positioned the “Com” for combination cutouts. The Rounded Rectangle Tool created a shape with the Type on a Path Tool.
 INDESIGN
Students learn important aspects of publishing for print in this section. InDesign gives students the ability to design documents—including graphics and writing copy. InDesign also helps design a professional resume and create a professional corporate identity (or brand) and collateral materials. Adobe InDesign is the industry-standard publishing application for print publications and interactive PDF documents.
InDesign, Adobe’s replacement for PageMaker, is an industry-standard desktop publishing program. Its uses range from print production, such as books and brochures, to digital publishing, such as eBooks, mobile apps and interactive documents. Primarily used for layout rather than as a content-creation tool, InDesign is used to combine text, images, vectors and other prepared content into a finished product for publishing. The newest versions of InDesign allow for a variety of digital publication methods ranging from interactive PDFs to full-fledged iPad applications. The user can choose from a wide range of tools, ranging from image overlays to hyperlink or footnote insertions, depending on their needs.
 FLYER
FLYER
Mainly this is a redesign of a photo collage and information used in my website. I rotated text for variety. PNG images allowed for overlays.
The target audience could be event or real estate venues. Individual or corporate clients could use visual, editorial, or training services.
Text fonts, shading, drop shadow, fill and stroke tools were employed for more appealing designs. Swatches used were standard print colors. Various alignment tools gave it a more professional look.
IDENTITY PACKAGE

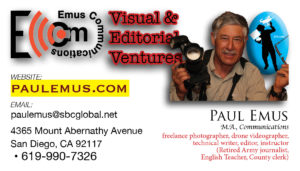

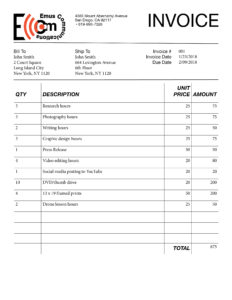 Challenges creating this package were design and formatting. The letterhead above is not quite as simple as samples in design books, but I like the use of work from previous assignments. For the card, I went with a regular photo because larger image tracings did not look good. I wanted to highlight my website which gives more information.
Tools used were color, drop shadow, and emboss effects. The invoice employed the table function after numerous experiments with alternating row colors, strokes, and trying to do a header. Coming from experience with Excel though, I found it difficult doing some functions. But I decided on a simple layout with some sample charges to show a client.
- ACROBAT PRO
This program is the essential tool for universal document exchange. Acrobat converts any document (including entire Web sites) into a PDF file, with its original appearance preserved, and then distributes it for viewing and printing on any system. Powerful markup tools make electronic review a snap, so students can collaborate more easily and productively than ever before. Acrobat is the file format used to FTP print files to printers.
- PORTFOLIO
Students create and present a Print portfolio which includes completed projects in Photoshop, Illustrator, Adobe Acrobat Pro, and InDesign. In addition, students create an up-to-date resume, business card, and stationery package.
Multimedia Module
The Multimedia Module builds on the Print module to include Adobe After Effects, and Premiere Pro, and audio editing such as Garageband.
- SOUND
Students learn the basics of sound-based editing software using Garage Band. GarageBand is an easy to use yet professional audio application designed for musicians and sound editors to create and edit their own masterpieces. Creating custom sounds and applying unique sound elements and enhancements to projects would be an asset to any company.
 GarageBand is Apple’s song making toolkit and software recording studio that can produce professional sounding, polished musical tracks. The program comes with 1,100 prerecorded loops, tracks for live recordings, and effects like reverb and panning.
 AFTER EFFECTS
After Effects software delivers a comprehensive set of tools to efficiently produce motion graphics and visual effects for film, video, multimedia, and the Web. Students can explore unlimited creative possibilities while working in a 2D or 3D compositing environment. After Effects has the capability to animate static images, further enhance presentations and take media still images, animations, video clips and Flash movies to compose them into a single video, adding effects and altering the nature of the images (and sounds) in a variety of different ways.
After Effects is a digital visual effects, motion graphics, and compositing application developed by Adobe Systems and used in the post-production process of film making and television production. Among other things, After Effects can be used for keying, tracking, compositing and animation. It also functions as a very basic non-linear editor, audio editor and media transcode. After Effects has extensive plug-in support; a broad range of third party plug-ins are available. A variety of plug-in styles exist, such as particle systems for realistic effects for rain, snow, fire, etc. With or without third-party plug-ins, After Effects can render 3D effects. Some of these 3D plug-ins use basic 2D layers from After Effects. In addition to 3D effects, there are plug-ins for making video look like film or cartoons; simulating fire, smoke, or water; particle systems; slow motion; creating animated charts, graphs, and other data visualization; calculating the 3D movement of a camera in a 2D video shot; eliminating flicker, noise, or rigging lines; translating timelines from FCP or Avid; adding high-end color correction; and other workflow improvements and visual effects.
ANIMATED LOGO
 Challenges of this project mainly concerned the interface of importing Illustrator layers into After Effects. The original logo made in Illustrator did not have distinct layers, and they had to be rearranged. Some pieces had to be replaced with cleaner PNG renditions from Photoshop. Then pieces of the logo could be animated. Other versions of logos were brought in along with iPod Ad, Portrait, and Identity files. These were given 3D Rotate, 2D Rotate, and Opacity fading in and out. Also Position, Scale and Motion Sketch transformations were applied. A soundtrack was made in GarageBand with 15 different loop tracks including beginning with Evolving Atmosphere and concluding with World Conga. The animation can be viewed here:
BUMPER
 My idea for this spot was a bumper advertising my YouTube playlist of videos from a roadtrip last month. I had a significant number of views among my groups on Facebook and wanted to show these with screen shots zooming into the view numbers by dragging position and scale. These segment times were used to time music created in Garage Band. The text I animated with opacity flash, wiggle, fluorescent light, fish bait, and autoscroll behaviors. I selected drone and zoom videos superimposed at 80 percent opacity. A PNG of my logo also was superimposed fading in and out at the beginning. PNG images of fish were animated with Wiggle, Rotate, Position, and Opacity fades, and one was parented placed behind text.
My personal experience was good. I tried updating screen shots by copying the transformations, and that didn’t work too well as I had to delete keyframes and do positions and scaling over again. Adjustments to keyframes were a little tedious having to wait for rendering.
My audience is social media Facebook groups, Instagram, Twitter, and email lists, and people that might have missed a video. It is hard to gauge the success of this, but it is nice to have a spot to post instead of just a link. The animation can be viewed here:
 PREMIERE PRO
Adobe Premiere is the video editing industry standard application with tools that make editing video both easy for the novice and powerful for the professional. Adobe Premiere Pro is a timeline-based video editing software application. It is part of the Adobe Creative Suite, a suite of graphic design, video editing and web development programs. Students learned how to capture and import video and audio and edit and export video to various offline or web formats.
Premiere Pro is a timeline-based video editing app developed by Adobe Systems and published as part of the Adobe Creative Cloud licensing program. First launched in 2003, Adobe Premiere Pro is a successor of Adobe Premiere (first launched in 1991). It is geared towards professional video editing, while its sibling, Adobe Premiere Elements, targets consumers market. CNN was an early adopter of Adobe Premiere. Also, in 2007, certain BBC departments adopted Premiere. It has been used to edit feature films, such as Deadpool, Gone Girl, Captain Abu Raed, and Monsters, and other venues such as Madonna’s Confessions Tour. Premiere Pro supports high resolution video editing at up to 10,240 × 8,192 resolution, at up to 32-bits per channel color, in both RGB and YUV. Audio sample-level editing, VST audio plug-in support, and 5.1 surround sound mixing are available. Premiere Pro’s plug-in architecture enables it to import and export formats beyond those supported by QuickTime or DirectShow, supporting a wide variety of video and audio file formats and codecs on both MacOS and Windows. When used with Cineform’s Neo line of plug-ins, it supports 3D editing with the ability to view 3D material using 2D monitors, while making individual left and right eye adjustments.
MUSIC AND SYNC
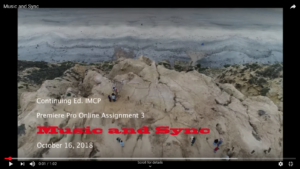 My idea was to force myself out of a mindset of wanting to keep most footage to select one-second short type clips for a fast paced trailer like you see in movie trailers. This required time reviewing footage from a recent road trip and doing a lot of trimming. Also I wanted to try the newly-discovered rotoscope of After Effects. And this led to three days of rotoscoping, requiring countless adjustments because maybe similar background to the subject.
The clunky interface of confusing windows of Premiere Pro was a little frustrating since I come from Final Cut Pro. But I pieced together clips with transitions and titles. Sound effects were simply brought in individually from Garage Band so they could be adjusted on audio tracks rather than do one overall audio track. Segments were scaled and positioned with key frames in Effects Controls. Warp stabilizer was applied to action cam clips. The Sharpen effect was applied to fish in water. I hope to discover many other features of Premiere Pro. The video may be viewed here:
GROUP PROJECT
 Our group project idea was to use mostly drone footage along with some hand-held camera video for a sort of “KPBS Above San Diego.” But we mainly wanted to practice Adobe Premiere Pro editing rather than do too much shooting. We also downloaded some free-use aerial footage of San Diego. With a storyboard as a guide, we compiled dozens of clips trimmed to under a minute. Then we brutally selected the best ones that seemed to flow as a “story.” Clips were combined with transitions and titles. Credits were made with the scrolling effect. Music was downloaded from the free YouTube Audiolibrary. This was edited with many tracks and volume controls in Garageband with selected Loops. The main challenge was stumbling around in Premiere Pro for the various menus. We applied color corrections and other adjustments to make the footage match each other better. The video may be viewed here:
PORTFOLIO:
Students created a CD or iDVD Multimedia Portfolio that included completed projects in Sound, After Effects, and Premiere Pro.
Web Module
The Web Module included XHTML, CSS, Dreamweaver and WordPress.
- INTERNET / XHTML / CSS
Learning how to create a web page, topics included the actual Hyper Text Markup Language (html) tags used to create Web pages, important concepts and terms; appropriate file formats, naming conventions, and organizational skills. Students also learned critical evaluation of Web sites and gained an understanding of the Web creation process.
 WORDPRESS/FILE MANAGEMENT/INTRO TO WEB DEVELOPMENT
Students learned the visual web design application that industry professionals choose to develop Web sites, automate production, and enhance team efficiency. WordPress can be customized using HTML and CSS giving students the power they need for rapid Web development. Students learned additional time saving production techniques with this high-end visual Web design program
WordPress is a free content management system used to build and maintain websites. Its ease of use and unique blogging features have helped it become the most popular blogging tool on the web.
WordPress provides a web-based user interface for designing, publishing, and updating websites. Instead of writing HTML, you can simply choose one of many different website templates or “themes” that has a design you like. You can then modify the layout and build a custom navigation bar. Once the site layout is complete, you can use WordPress’ online interface to create individual pages. Each page may include formatted text, links, images, and other media. You can publish completed webpages or blog updates by simply clicking the Publish button.
The WordPress interface makes it easy for anyone without web development experience to create and publish a website. The built-in blogging tools provide a simple way to track individual posts, visitors, and user comments. If WordPress’ built-in capabilities are not sufficient for your needs, you can install different plug-ins that provide extra features. Examples include social media buttons, image galleries, and web forum tools.
While there are thousands of WordPress templates and plug-ins available, the WordPress system still has its limitations. Because it is a template-based service, you must begin with a pre-built website rather than create pages from scratch. Additionally, you cannot insert scripts or maintain a database with the same level of control that a custom website offers. Therefore, most companies and large organizations still hand-code websites or develop them using a WYSIWYG editor like Dreamweaver.
For many individuals, however, WordPress provides a great blogging system that is both convenient and free.
 My idea for five pages of portfolio was to use existing pages of my web site, paulemus.com. So I think the existing site actually was improved by updated content and menu titles as follows:
Portfolio 1: Biography
Portfolio 2: Optimized Photos
Portfolio 3: Videos
Portfolio 4: Full-size Photos
Portfolio 5: Continuing Ed.
The biography used the photos and text from the biography assignment in the print module from IMCP. The optimized photos are recent photos used with the San Diego Photo Club during membershare and contests. These photos were optimized with a plugin called Smush and were displayed with a gallery plugin called Envira. The videos page has different sliders from Metaslider plugin and are linked to my YouTube videos. I have a page of full-size photos since I want to display my photography on high-resolution monitors, like my 5K iMac, where there is a real difference in showing photo quality, which is important for my site and targeted audience. Then the fifth portfolio site has IMCP projects uploaded to the media library and linked to YouTube.
- PORTFOLIO
For the final IMCP-FT assignment students created a Portfolio website in Dreamweaver.
 Dreamweaver is a comprehensive website authoring program for Windows and Mac from Adobe. Dreamweaver enables the HTML programmer to build complex websites using HTML, JavaScript and server-side programming languages. It immediately renders the code in a design window. Prebuilt templates provide rudimentary foundations for creating Web pages. Originally developed by Macromedia, Dreamweaver was acquired by Adobe in 2005. This web design and development application uses both a visual design surface known as Live View and a code editor with standard features such as syntax highlighting, code completion, and code collapsing as well as more advanced features such as real-time syntax checking and code introspection for generating code hints to assist the user in writing code. Combined with an array of site management tools, Dreamweaver allows for its users to design, code and manage websites, as well as mobile content. Dreamweaver is an Integrated Development Environment (IDE) tool. You can live preview the changes for the frontend. Dreamweaver is positioned as a versatile web design and development tool that enables visualization of web content while coding.
Dreamweaver, like other HTML editors, edits files locally then uploads them to the remote web server using FTP, SFTP, or WebDAV.
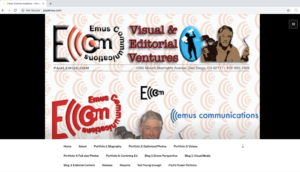
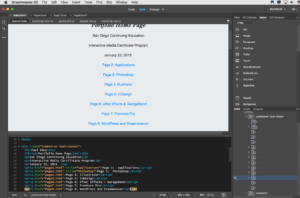 This site was made with Dreaweaver as a responsive portfolio web site. Desired message is a comprehensive portfolio of projects completed for the certificate program. The home page provided navigation to the other pages representing work done with different Adobe and other applications, with a visual graphic of the applications. On page 2, I wanted to include upfront a description of the applications for many who may not know about them. On page 3 is completed project examples of Photoshop; page 4, Illustrator; page 5, InDesign; page 6 After Effects and GarageBand; page 7, Premiere Pro; and page 8, WordPress and Dreamweaver.
Lessons learned included use of the Dreamweaver application to work the code that is modified by pasting in Bootstrap code from W3 Schools (Bootstrap 3 instead of Bootstrap 4; which caused a problem with fluid code). Various tabs and tools were used to add and modify images and text. This skill may come in handy someday, but WordPress seems more user friendly and feature rich with plug-ins for my personal website that doesn’t need advanced web development coding. The responsive function is beneficial and not currently on my WordPress website, except as part of the theme.
Target audience is freelance job opportunities that would be leveraged by a portfolio showing actual experience with current Adobe and other applications that updates my graduate degree in Communications. Thank you.